|
GDI
Accessories and Tools: CBrush
|
| |
|
A
brush is a drawing tool used to fill out closed
shaped or the interior of lines. A brush behaves
like picking up a bucket of paint and pouring it
somewhere. In the case of computer
graphics, the area where you
position the brush is called the brush origin. The
color (or picture) that the brush holds would be
used to fill the whole area until the brush finds
a limit set by some rule.
A
brush can be characterized by its color (if used),
its pattern used to fill the area, or a picture
(bitmap) used as the brush.
To
create a brush, the MFC provides the CBrush
class. Therefore, to start, you can declare a
variable of this type using the default
constructor as follows:
CBrush NewBrush;
|
Because
there can be so many variations of brushes, there
are different member functions for the various
possible types of brushes you would need. The
easiest brush you can create is made of a color.
A
brush is referred to as solid if it is made of a
color simply used to fill a closed shaped. To
create a solid brush, you can use the following
constructor:
CBrush(COLORREF crColor);
The
color to provide as the crColor
argument follows the rules we reviewed for colors.
To
use the newly created brush, you can select it
into the device context by calling the CDC::SelectObject().
Once this is done. Any closed shape you draw
(ellipse, rectangle, polygon) would be filled with
the color specified. After using the brush, you
can dismiss it and restore the previous brush.
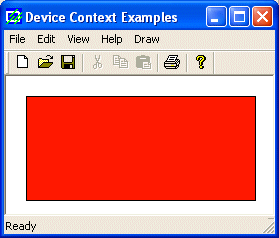
Here is an example:
void CExoView::OnDraw(CDC* pDC)
{
	CExoDoc* pDoc = GetDocument();
	ASSERT_VALID(pDoc);

	CBrush NewBrush(RGB(250, 25, 5));

	CBrush *pBrush = pDC->SelectObject(&NewBrush);
	pDC->Rectangle(20, 20, 250, 125);

	pDC->SelectObject(pBrush);
}
|
 |
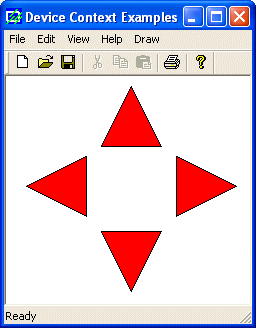
Once
a brush has been selected, it would be used on all
shapes that are drawn under it, until you delete
or change it. Here is an example:
void CExoView::OnDraw(CDC* pDC)
{
	CExoDoc* pDoc = GetDocument();
	ASSERT_VALID(pDoc);

	CBrush NewBrush(RGB(255, 2, 5));
	CBrush *pBrush;

	CPoint Pt[3];

	// Top Triangle
	Pt[0] = CPoint(125,  10);
	Pt[1] = CPoint( 95,  70);
	Pt[2] = CPoint(155,  70);

	pBrush = pDC->SelectObject(&NewBrush);
	pDC->Polygon(Pt, 3);

	// Left Triangle
	Pt[0] = CPoint( 80,  80);
	Pt[1] = CPoint( 20, 110);
	Pt[2] = CPoint( 80, 140);

	pDC->Polygon(Pt, 3);

	// Bottom Triangle
	Pt[0] = CPoint( 95, 155);
	Pt[1] = CPoint(125, 215);
	Pt[2] = CPoint(155, 155);

	pDC->Polygon(Pt, 3);

	// Right Triangle
	Pt[0] = CPoint(170,  80);
	Pt[1] = CPoint(170, 140);
	Pt[2] = CPoint(230, 110);

	pDC->Polygon(Pt, 3);

	pDC->SelectObject(pBrush);
}
|
 |
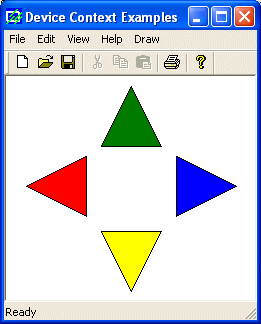
If
you want to use a different brush, you should
create a new one. Here is an example:
void CExoView::OnDraw(CDC* pDC)
{
	CExoDoc* pDoc = GetDocument();
	ASSERT_VALID(pDoc);

	CBrush BrushGreen(RGB(0, 125, 5));
	CBrush BrushRed(RGB(255, 2, 5));
	CBrush BrushYellow(RGB(250, 255, 5));
	CBrush BrushBlue(RGB(0, 2, 255));
	CBrush *pBrush;

	CPoint Pt[3];

	// Top Triangle
	Pt[0] = CPoint(125,  10);
	Pt[1] = CPoint( 95,  70);
	Pt[2] = CPoint(155,  70);

	pBrush = pDC->SelectObject(&BrushGreen);
	pDC->Polygon(Pt, 3);

	// Left Triangle
	Pt[0] = CPoint( 80,  80);
	Pt[1] = CPoint( 20, 110);
	Pt[2] = CPoint( 80, 140);

	pBrush = pDC->SelectObject(&BrushRed);
	pDC->Polygon(Pt, 3);

	// Bottom Triangle
	Pt[0] = CPoint( 95, 155);
	Pt[1] = CPoint(125, 215);
	Pt[2] = CPoint(155, 155);

	pBrush = pDC->SelectObject(&BrushYellow);
	pDC->Polygon(Pt, 3);

	// Right Triangle
	Pt[0] = CPoint(170,  80);
	Pt[1] = CPoint(170, 140);
	Pt[2] = CPoint(230, 110);

	pBrush = pDC->SelectObject(&BrushBlue);
	pDC->Polygon(Pt, 3);

	pDC->SelectObject(pBrush);
}
|
 |
If
you had declared a CBrush
variable using the default constructor, you can
initialize it with a color by calling the CBrush::CreateSolidBrush()
method. Its syntax is:
BOOL CreateSolidBrush(COLORREF crColor);
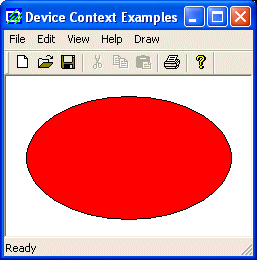
This
member function can be used in place of the second
constructor. It takes the same type of argument, a
color as crColor and
produces the same result. Here is an example:
void CExoView::OnDraw(CDC* pDC)
{
	CExoDoc* pDoc = GetDocument();
	ASSERT_VALID(pDoc);

	CBrush BrushOlive;
	CBrush *pBrush;

	BrushOlive.CreateSolidBrush(RGB(255, 2, 5));
	pBrush = pDC->SelectObject(&BrushOlive);

	pDC->Ellipse(20, 20, 226, 144);
	pDC->SelectObject(pBrush);
}
|
 |
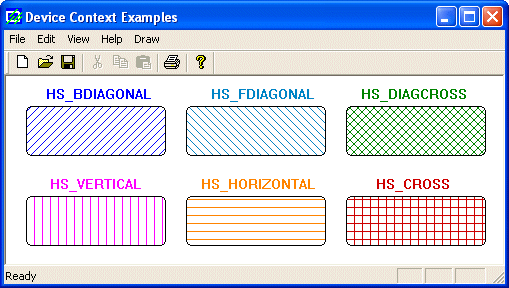
A
hatch brush is one that uses a drawn pattern to
regularly fill an area. Microsoft Windows provides
6 preset patterns for such a brush.
To
create a hatched brush, you can use the following
constructor:
CBrush(int nIndex, COLORREF crColor);
If
you had declared a CBrush variable using the
default constructor, you can call the CreateHatchBrush()
member function to initialize it. The syntax of
this method is:
BOOL CreateHatchBrush(int nIndex, COLORREF crColor);
In
both cases, the nIndex
argument specifies the hatch pattern that must be
used to fill the area. The possible values to use
are HS_BDIAGONAL, HS_CROSS,
HS_DIAGCROSS, HS_FDIAGONAL,
HS_HORIZONTAL, or HS_VERTICAL.
The
crColor argument
specifies the color applied on the drawn pattern.
Here
is an example:
void CExoView::OnDraw(CDC* pDC)
{
	CExoDoc* pDoc = GetDocument();
	ASSERT_VALID(pDoc);

	CBrush brBDiagonal(HS_BDIAGONAL, RGB(0, 0, 255));
	CBrush brCross;
	CBrush brDiagCross(HS_DIAGCROSS, RGB(0, 128, 0));
	CBrush brFDiagonal;
	CBrush brHorizontal(HS_HORIZONTAL, RGB(255, 128, 0));
	CBrush brVertical;

	CBrush *pBrush;

	pBrush = pDC->SelectObject(&brBDiagonal);
	pDC->RoundRect( 20,  30, 160, 80, 10, 10);

	brFDiagonal.CreateHatchBrush(HS_FDIAGONAL, RGB(0, 128, 192));
	pBrush = pDC->SelectObject(&brFDiagonal);
	pDC->RoundRect(180, 30, 320, 80, 10, 10);

	pBrush = pDC->SelectObject(&brDiagCross);
	pDC->RoundRect(340, 30, 480, 80, 10, 10);

	brVertical.CreateHatchBrush(HS_VERTICAL, RGB(255, 0, 255));
	pBrush = pDC->SelectObject(&brVertical);
	pDC->RoundRect(20, 120, 160, 170, 10, 10);

	pBrush = pDC->SelectObject(&brHorizontal);
	pDC->RoundRect(180, 120, 320, 170, 10, 10);

	brCross.CreateHatchBrush(HS_CROSS, RGB(200, 0, 0));
	pBrush = pDC->SelectObject(&brCross);
	pDC->RoundRect(340, 120, 480, 170, 10, 10);

	pDC->SetTextColor(RGB(0, 0, 255));
	pDC->TextOut(40, 10, "HS_BDIAGONAL", 12);
	pDC->SetTextColor(RGB(0, 128, 192));
	pDC->TextOut(205, 10, "HS_FDIAGONAL", 12);
	pDC->SetTextColor(RGB(0, 128, 0));
	pDC->TextOut(355, 10, "HS_DIAGCROSS", 12);
	pDC->SetTextColor(RGB(255, 0, 255));
	pDC->TextOut(44, 100, "HS_VERTICAL", 11);
	pDC->SetTextColor(RGB(255, 128, 0));
	pDC->TextOut(195, 100, "HS_HORIZONTAL", 13);
	pDC->SetTextColor(RGB(200, 0, 0));
	pDC->TextOut(370, 100, "HS_CROSS", 8);

	pDC->SelectObject(pBrush);
}
|
 |
A
pattern brush is one that uses a bitmap or (small)
picture to fill out an area. To create DDB bitmap,
you can first create an array of WORD values. Then
call the CBitmap::CreateBitmap() method to
initialize it. As this makes the bitmap ready,
call the CBrush::CreatePatternBrush()
method to initialize the brush. The syntax of this
member function is:
BOOL CreatePatternBrush(CBitmap* pBitmap);
Once
the brush has been defined, you can select in into
a device context and use it as you see fit. For
example, you can use it to fill a shape. Here is
an example:
void CCView4View::OnDraw(CDC* pDC)
{
	CCView4Doc* pDoc = GetDocument();
	ASSERT_VALID(pDoc);

	CBitmap Bmp;
	CBrush brBits;
	WORD wBits[] = { 0x00, 0x22, 0x44, 0x88, 0x00, 0x22, 0x44, 0x88,
		        0x22, 0x44, 0x88, 0x00, 0x22, 0x44, 0x88, 0x00,
		        0x44, 0x88, 0x00, 0x22, 0x44, 0x88, 0x00, 0x22,
		        0x88, 0x00, 0x22, 0x44, 0x88, 0x00, 0x22, 0x44 };

	Bmp.CreateBitmap(32, 32, 1, 1, wBits);

	brBits.CreatePatternBrush(&Bmp);
	CBrush* pOldBrush = (CBrush*)pDC->SelectObject(&brBits);

	pDC->Rectangle(20, 20, 400, 400);

	pDC->SelectObject(&Bmp);
}
|
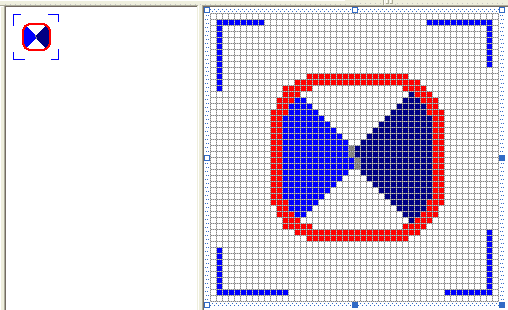
Another
technique you can use to create a pattern brush
consists of using a bitmap resource. Before
creating a pattern, you must first have a picture,
which can be done by creating a bitmap. For
example, imagine you create the following bitmap:
To
create a brush based on a bitmap, you can use the
following constructor:
CBrush(CBitmap* pBitmap);
If
you had declared a CBrush variable using the
default constructor, you can call the CBrush::CreatePatternBrush()
member function to initialize it. Its syntax is:
BOOL CreatePatternBrush(CBitmap* pBitmap);
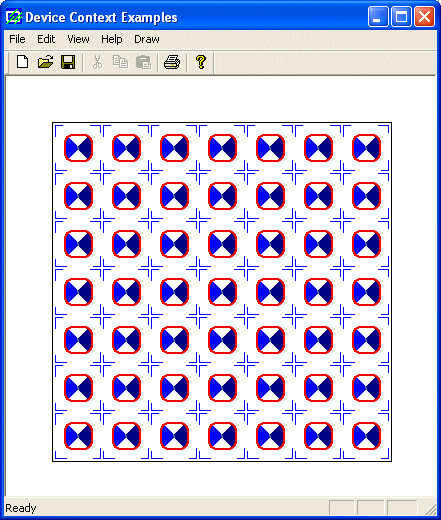
Here
is an example:
void CExoView::OnDraw(CDC* pDC)
{
	CExoDoc* pDoc = GetDocument();
	ASSERT_VALID(pDoc);

	CBrush brPattern;
	CBitmap Bmp;
	CBrush *pBrush;

	Bmp.LoadBitmap(IDB_BITMAP1);//"C:\\Programs\\woman2.bmp");

	brPattern.CreatePatternBrush(&Bmp);

	pBrush = pDC->SelectObject(&brPattern);
	pDC->Rectangle(46, 46, 386, 386);

	pDC->SelectObject(pBrush);
}
|
 |
The
Win32 library provides the LOGBRUSH
structure that can be used to create a brush by
specifying its characteristics. LOGBRUSH is
defined as follows:
typedef struct tagLOGBRUSH {
  UINT     lbStyle;
  COLORREF lbColor;
  LONG     lbHatch;
} LOGBRUSH, *PLOGBRUSH;
The
lbStyle member variable specifies the style
applied on the brush.
The
lbColor is specified as a COLORREF value.
The
lbHatch value represents the hatch pattern used on
the brush.
Here
is an example:
void CExoView::OnDraw(CDC* pDC)
{
	CExoDoc* pDoc = GetDocument();
	ASSERT_VALID(pDoc);

	CBrush *pBrush;
	CBrush brLogBrush;
	LOGBRUSH LogBrush;

	LogBrush.lbStyle = BS_HATCHED;
	LogBrush.lbColor = RGB(255, 0, 255);
	LogBrush.lbHatch = HS_DIAGCROSS;

	brLogBrush.CreateBrushIndirect(&LogBrush);
	pBrush = pDC->SelectObject(&brLogBrush);

	pDC->Rectangle(20, 12, 250, 175);

	pDC->SelectObject(pBrush);
}
|
|


