Introduction
I have
chosen to develop this
.NET user
control
to explore the easy yet powerful
.NET GDI+.
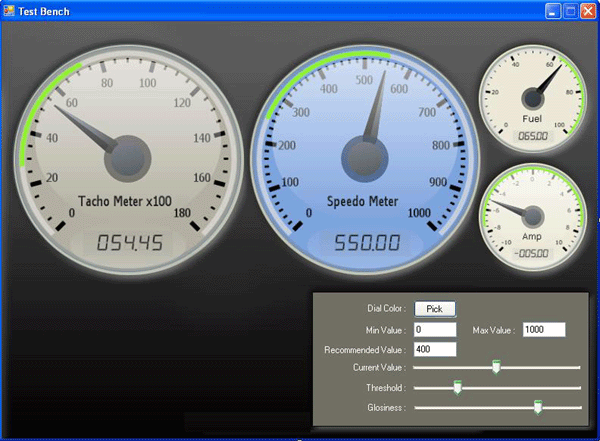
This simple gauge
control developed using .NET 2.0
can cater to the entire range of monitoring
purposes. Let's see how to develop such a
glossy control using
GDI+.
Overridden
User Control
Methods
Normally,
If we create user controls that have been
fully drawn by the user, we should override
the
OnPaint
and
OnPaintBackground
methods. Additionally, the
control
styles are to be set as appropriate. The
following common styles can be set using
									this.SetStyle(ControlStyles.XXXXX,
									true/false);
.
SupportsTransparentBackColor |
This will enable your
Gauge
control
to support a transparent backcolor
if set to
true. |
ControlStyles.ResizeRedraw |
Allows repainting when the
control
is resized. |
ControlStyles.AllPaintingInWmPaint |
If
true,
the control
ignores the window message
WM_ERASEBKGND
to reduce flicker.
This style should only be applied if
the
UserPaint
bit is set to
true.
|
ControlStyles.UserPaint |
If
true,
the control
paints itself rather than the
operating system doing so. |
ControlStyles.OptimizedDoubleBuffer |
If
true,
the control is first
drawn
to a buffer rather than directly to
the screen, which can reduce
flicker. If you set this property to
true,
you should also set the
AllPaintingInWmPaint
to
true. |
The
OnPaint
and
OnPaintBackground
methods will be called whenever the control
needs to be repainted. For
example,
when the control
is resized or the form is minimized and
maximized, the
OnPaint
method will be called.
OnPaintBackground vs. OnPaint
OnPaintBackground
paints the background (and thereby the
shape) of the Window and is guaranteed to be
fast. In contrast,
OnPaint
paints the details and might be slower
because individual paint requests are
combined into one
Paint
event that covers all areas that have to be
redrawn. You might want to invoke the
OnPaintBackground
if, for instance, you want to
draw a
gradient-colored background for your
control.
While
OnPaintBackground
has an event-like nomenclature and takes the
same argument as the
OnPaint
method,
OnPaintBackground
is not a
true
event method. There is no
PaintBackground
event and
OnPaintBackground
does not invoke event delegates. When
overriding the
OnPaintBackground
method, a derived class is not required to
invoke the
OnPaintBackground
method of its base class.
Drawing the
Guage Dial
First,
let's see how to draw the dial. The dial
requires a Scale, Threshold Indicator, some
text and the current value to be displayed.
Drawing
the scale requires calculating the positions
for the rules that are to be
drawn at
the circumference. Let's say we need to
draw a
scale starting from 0 to 10 from angle 90
degrees to 270 degrees on the dial. In this
case, the difference in the degrees (270-90
= 180) must be divided into 10 parts. To
find the position for each part to be
drawn,
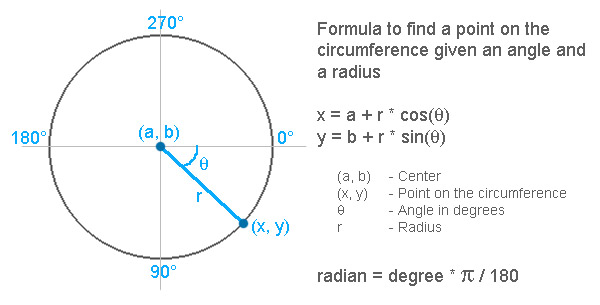
we need the following formula:
x = centerX + radius * cos(180/partNo)
y = centerY + radius * sin(180/partNo)
Note: when
using
Math.Cos
or
Math.Sin
we should give angles in radians.

After
finding the position, we can
draw any
type of scale mark on the circumference. I
have chosen to draw
a line as a scale mark. Since the dial area
is not going to be changed often, it can be
drawn in
OnPaintBackground
overridden method.
Drawing the
Pointer
The pointer
may need to be repainted often. So, it is
better to draw
it in the
OnPaint
method. Finding the pointer position is the
same as the logic for
drawing the scale. The pointer
can be drawn using
graphicsObj.FillPolygon()
method and it can be transformed to any
angle that will represent the current value.
Otherwise, the pointer can be redrawn for
every change made for the current value.
Drawing the
Glossiness
Drawing
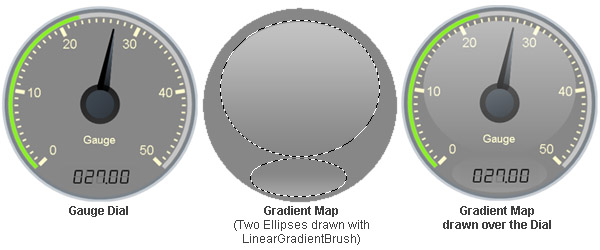
the glossiness is very simple. All you have
to do is, after painting all the dial and
pointer, fill two ellipses with gradient
coloring. The
LinearGradientBrush
class provides the ability to
draw
gradient fills. Mucancode.neting the gradient layer
over the dial gives the glossiness as shown
in the below figure.

Using the
Aqua Gauge Control
This
Aqua Gauge
control can be used as any other
user control provided by Windows. The
following are the
control-specific properties that
can be used to configure this gauge to suit
your requirements.
|
Property Name |
Type |
Description |
DialColor |
Color |
Gets
or
Sets
the background color for the
gauge. |
DialText |
String |
Gets
or
Sets
the Text displayed on the
gauge
dial. |
EnableTransparentBackground |
bool |
Enables or Disables Transparent
Background color. Note: Enabling
this will reduce the performance and
may make the control flicker. |
Glossiness |
float |
Gets
or
Sets
the strength of the Glossiness. |
MaxValue |
float |
Gets
or
Sets
the maximum value shown on the
gauge
scale. |
MinValue |
float |
Gets
or
Sets
the minimum value shown on the
gauge
scale. |
NoOfDivisions |
int |
Gets
or
Sets
the number of divisions on the
gauge
scale. |
NoOfSubDivisions |
int |
Gets
or
Sets
the number of subdivisions displayed
on the scale for each division. |
RecommendedValue |
float |
Gets
or
Sets
the recommended value on the scale.
This will be used as a pivot point
for drawing the threshold area. |
ThresholdPercent |
float |
Gets
or
Sets
the Threshold area percentage on the
scale. |
Value |
float |
Gets
or
Sets
the value to which the pointer will
point. |
Points of
Interest
Whenever we
draw
images with lots of manipulations, it is
recommended to draw
it on an image object and then paint. For
example,
drawing the gauge
dial requires lots of CPU-consuming
operations. So, we can draw the dial onto an
image and then draw using
graphicsObj.DrawImage().
Whenever changes are made on the dial
properties, we can recreate the image
object. It would improve the performance.


