|
Configuration
Name
|
Default
Library Name
|
|
MFC
Dll,XD++ Dll Release |
XD**.lib |
|
MFC
Dll,XD++ Dll Debug |
XDD**.lib |
|
MFC
Dll,XD++ Dll Unicode Release |
XDU**.lib |
|
MFC
Dll,XD++ Dll Unicode Debug |
XDUD**.lib |
|
MFC
Dll ,XD++ Lib Release |
XDS**.lib |
|
MFC
Dll ,XD++ Lib Debug |
XDSD**.lib |
|
MFC
Dll ,XD++ Lib Unicode Release |
XDUS**.lib |
|
MFC
Dll ,XD++ Lib Unicode Debug |
XDUSD**.lib |
|
MFC
Lib ,XD++ Lib Release |
XDLS**.lib |
|
MFC
Lib ,XD++ Lib Debug |
XDLSD**.lib |
|
MFC
Lib ,XD++ Lib Unicode Release |
XDLUS**.lib |
|
MFC
Lib ,XD++ Lib Unicode Debug |
XDLUSD**.lib |
NOTE:
**
Denotes the version of the library. For example, if you are
using version 6.0.0, then the Win32 Debug DLL would be
XDD60.dll.If you are linking to XD++ as a DLL, you need to
add FO\Lib directory to your path or manually copy the XD++
DLLs to your Windows directory.
Note: If you are
using the evaluation version of the library, only the XD++ MFC
Library - Win32 Debug version of the DLL is supplied including
associated lib files. You will not need to build the library.
Back to
Top
Q:
What do I need to do to begin using the XD++ Library,
and how do I set up VisualStudio®?
A: In Visual Studio you will need to make the
following changes, assuming that you have installed the
XD++ Library in the directory "C:\Program Files\UCanCode
Software Inc\XD++ MFC Library". If you installed the XD++
into another location you will need to adjust this
accordingly:
For Visual C++ 5.0 &
6.0 users:
- From the Visual Studio IDE
select the ‘Tools’ then ‘Options’ pull-down menu.
- Once the ‘Options’
dialog opens, select the ‘Directories’ tab.
- Set ‘Show directories
for:’ to ‘Include files’.
- Add ‘C:\Program Files\UCanCode
Software\XD++ MFC Library\FO\Include’ to the list.
- Set ‘Show directories
for:’ to ‘Library files’.
- Add ‘C:\Program Files\UCanCode
Software\XD++ MFC Library\Lib’ to the list.
- Set ‘Show directories
for:’ to ‘Source files’.
- Add ‘C:\Program Files\UCanCode
Software\XD++ MFC Library\FO\Source’ to the list.
For Visual C++ Other (.NET)
users:
- From the Visual Studio IDE
select the ‘Tools’ then ‘Options’ pull-down menu.
- Once the ‘Options’
dialog opens, select the ‘Projects’ folder, then
‘VC++ Directories’.
- Set ‘Show directories
for:’ to ‘Include files’.
- Add ‘C:\Program Files\UCanCode
Software\XD++ MFC Library\FO\Include’ to the list.
- Set ‘Show directories
for:’ to ‘Library files’.
- Add ‘C:\Program Files\UCanCode
Software\XD++ MFC Library\Lib’ to the list.
- Set ‘Show directories
for:’ to ‘Source files’.
- Add ‘C:\Program Files\UCanCode
Software\XD++ MFC Library\FO\Source’ to the list.
In the Read-only symbol directives box, type the following
code on the last line:
#include "fores.h"
In the
Compile-time directives box, type the following line:
#include "fores.rc"
Click the OK
button. A warning dialog appears. Click the OK
button again.
After you download and
installed the library, to get started, open the XD++ Library
project workspace (see above question, if you are using the
evaluation version this does not apply to you). Depending on
your platform, build both the debug and release versions of
the library. After you have done this, open the AppWizard
workspace and build the project. Now you can run the wizard
the same way you normally would create a new MFC project using
the standard AppWizard. Also, it may be a good idea to build
the examples as well so you can see how your project may look.
You can do this by opening the examples workspace.
Back to
Top
Q: What do I use my program support Ole Drag and drop?
A:
To let your program support
Ole Drag and Drop, you need add the following code at the CWinApp's
InitInstance. Example:
BOOL
CCustomSampleApp::InitInstance()
AfxOleInit();
Q:
What do I need to do to set up my existing
application to use the XD++ Library?
A:
To get started to used the XD++ with your
existing application, make you have included the following
line in your stdafx.h file, make sure that the .\lib, .\bin
and .\include directories where the XD++ was installed have
been added to DevStudio's directories list:
#include <FO.H> // XD++ Library MFC extensions
Back to
Top
Q:
How can I build an application after
installing the XD++ Library?
A:
The
instructions below explain how to build XD++
library using the Visual C++ project
workspaces shipped with product.
(1).Start Visual C++ Developer Studio.
(2).Open the XD++ project from the бн\UCanCode Software\XD++ Library\FO\
directory.
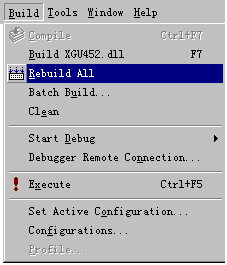
(3).From the Build menu in Visual
Studio, select Set Active
Configuration and then choose the build configuration that suits your needs.
By default, Debug is selected.
(4).From the Build menu in Visual
Studio, select Rebuild all to
build the selected library.

5.Now you can try to build your own applications
then.
Back to Top
More
information about XD++, you can find by click
here.
[ First |
Prev |
Next |
Last
]
|


